Why is backup important? Because hard drives fail. Hard drives have mechanical parts that work with high precision, high speed and very low tolerances. A hard drive is a set of spinning platters covered in magnetic particles with multiple read heads that float over the surface of each platter, almost touching the platter. The typical disk spins at 7200 RPM and is running constantly while the computer is turned on. The reading heads move over the surface of the disk to find the data you need for your computer to run. Eventually, this hardware breaks and when it does, you won't be able to recover your data. Unless you have a backup.
I have two computers at home that are in active use every day: my desktop and my wife Alice's desktop. They are both connected to a home network. Alice's laptop is on the wifi network and my computer is on the wired network. The backup server is wired to the network, too.
To put this together, we're going to need a laundry list of items. Obviously, the first part needed is a Rasberry Pi. They're all over Amazon and the web and they look like this:
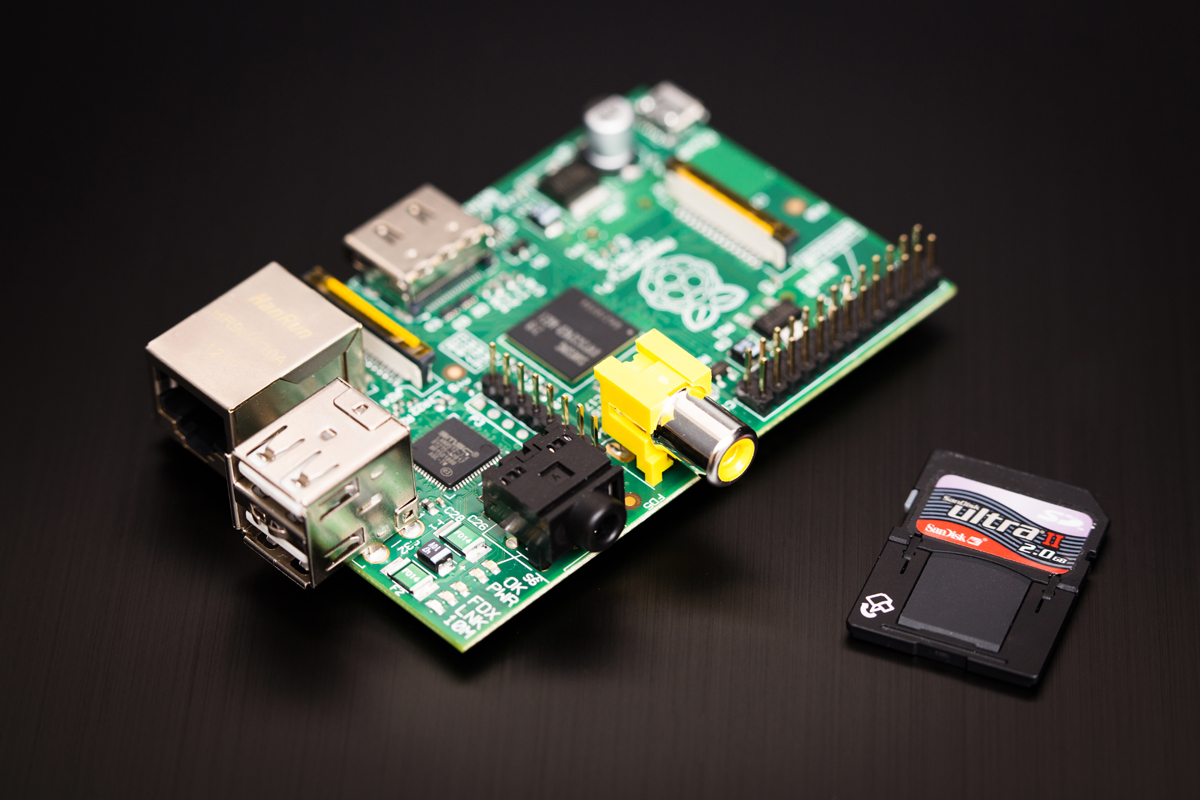
This tiny little computer has a network port, USB ports and an HDMI video port in case you want to use it as a media server. You can run the Pi as a media server, but I found XBMC to be very slow on it. So I've repurposed it as a backup server in my home and this series, I will show you how I did it.
You can get a starter kit at Rasberrypi.org for 75 Pounds in the UK, or you can shop around for the parts. This starter kit isn't the only one available online, but it contains most everything you need to get started. In this article, I will show you a more complete list with details. Amazon has the Pi in spades, but you won't find any resellers selling the Pi for just $35. If you want that, you'll have to order from one of the authorized resellers listed on the Rasberry Pi site. Here is a good place to start. Or you can get a different complete starter kit here.
Once you have a Pi, get a cover for $10 @ adafruit. Get an HDMI cable if you don't have a spare. Get a network cable if you don't have a spare. You'll need the HDMI cable to connect to a monitor or TV so you can set it up for the first time.
I don't recommend using a wireless adapter. Wireless adapters tend to run warm and will require a powered USB hub to work. Worse, it's rather difficult to find one that is supported by the stock Linux kernel. I highly recommend Monoprice for cables. Why pay $60 for an HDMI cable or $14 for a 7' network cable when you can get the same for a few bucks at Monoprice?
You will also need a power supply. It's basically a power adapter with a USB plug. And you will need a USB cable to connect the power to the Pi. In all, you'll probably spend about $70 for parts, including the Pi. You can get all of your cables at Monoprice. Here is a complete parts list with specifications and links to suppliers:
- Rasberry Pi, Model B
- Rasberry Pi cover
- 8 GB MMC SD Card
- HDMI cable, 6'
- 6' CAT6 cable
- USB cable, Type B to Micro Type A, 3'.
- Power Supply; AC-DC; 5V@1A; 90-264V.
- USB keyboard.
A few words about the items on this list. Cable lengths are optional. As long as you can reach the TV or monitor with your Pi connected to the network and power supply, that's all that matters. You can source the parts anywhere you want, but I've included links here to Monoprice because I've just never gone wrong with them. The only exceptions in this list are for the Pi, the cover and the SD card, with a link to Office Depot.
Oh, yes. You'll want storage. at least the same or greater than what you're using on your computer now. 500 gigabytes or 1 terabyte will do. You want to be sure that the external storage you use is powered. Many of the drives out there are powered by USB. The Rasberry Pi has only 5 V and one amp on tap. That isn't enough for a wireless adapter, so it's probably not enough to support a USB powered external hard drive. So you definitely want a drive that has a power adapter, or plan on adding a powered USB hub to the parts list.
I like the Western Digital line of MyBook drives. The two main competitors, Seagate and WD both carry a fine line of drives, but I have more experience with WD. As noted above, look for drives that come with an AC adapter - they are often referred to as "desktop drives". They usually have nice padded feet on the bottom for a little bit of vibration isolation and they are kind to the surface of your desk. They can range from $60 to a bit more than $100 each. One will suffice for now.
This is the hardware required to get going. In the next installment, we'll look at preparing the Pi for the first run.
No comments:
Post a Comment